
Users, roles and partner access
NetSense access control answers two independent questions per user: what can they do (their role) and what can they see (their constraints). The two are enforced separately and combine with AND, which is what lets you hand out portal access freely, to NOC staff, field engineers, partners and local cable operators, without anyone seeing more than their slice of the network.
This guide covers creating a user and the mechanics behind access control, then walks three scenarios end to end:
- Building a custom role when none of the built-ins fit
- Scoping a user to specific devices — a zone, a POP, or both
- Giving an LCO/partner their own view in an ISP–LCO deployment
Creating a user
Section titled “Creating a user”NetSense has no self-service signup. Every account is created by an admin from Settings → Users, and the form asks for the person’s identity and their roles in one go — the constraints that narrow what they can see are added afterwards, as a separate step.
Two things have to be true before you can do it:
- You hold
user:editin the tenant. - The tenant has user management enabled — the Enable user management switch in the tenant’s authentication settings. With it off the Invite User button is hidden, and the form itself answers “You do not have permission to invite users to this tenant.”
The steps
Section titled “The steps”-
Go to Settings → Users and click Invite User, top right.

-
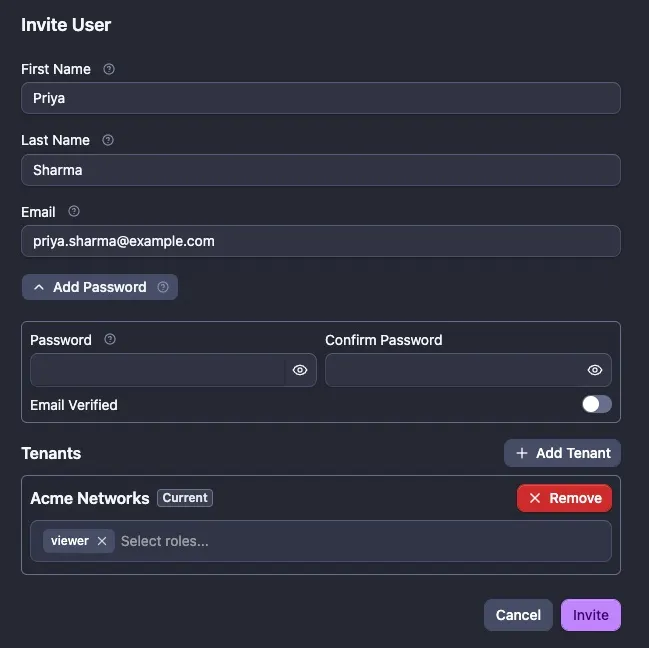
Fill in First Name and Last Name (up to 64 characters each) and Email (up to 128). There is no separate username field — the email address is the username, so it must be unique across the whole installation and it should be one the person can actually receive mail at.
-
Optionally open Add Password to set an initial password — see Password or no password below.
-
Under Tenants, pick the roles this person should have. Your tenant is already listed and selected — see Choosing their roles.
-
Click Invite. You are returned to the Users list with the new account on it.
The invite creates the account and grants roles. It does not set constraints, and a user with no constraints sees everything their role allows across the whole tenant. If this person is meant to see only a zone, a POP or a partner’s devices, follow up straight away with Scenario 2 or Scenario 3: reopen them from the list (the pencil on their row), set the constraints and press Save Constraints.
Password or no password
Section titled “Password or no password”Add Password is collapsed by default, and leaving it collapsed is the normal case: the account is created without a credential and the person establishes their own through the login service, so no password passes through you at all.
Open it and you get Password, Confirm Password and an Email Verified switch:
- The password must be 8 to 70 characters and contain an uppercase letter, a lowercase letter, a number and a symbol. The form validates as you type.
- Any password you set here is temporary. NetSense always marks it change-required, so the user is forced to choose a new one at first login. It is a handover mechanism, not a credential to keep using — and not one to share between people.
- Email Verified marks the address as already confirmed so the user skips the verification step. Turning it on means you are vouching for the address; a typo becomes an account nobody can recover.
Choosing their roles
Section titled “Choosing their roles”Roles are assigned while you create the account, in the Tenants block at the bottom of the form. Your own tenant is already listed there and marked Current, so in practice this step is just opening the dropdown and picking what the person should be able to do.
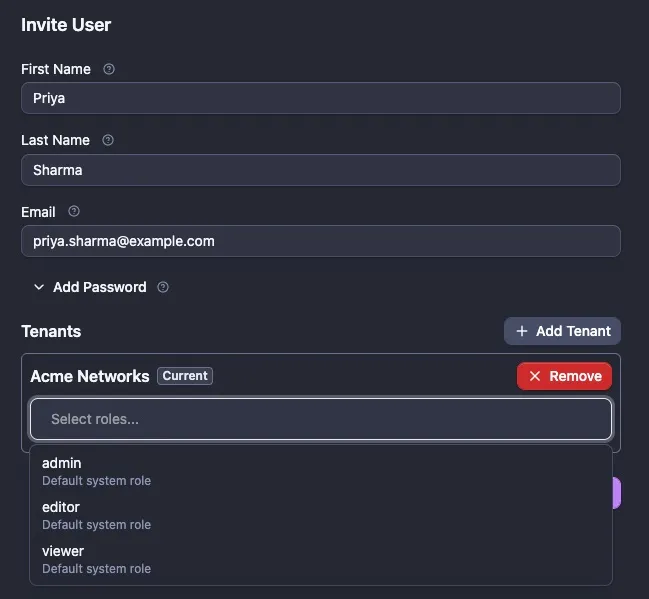
The picker offers the three built-in roles alongside any custom roles you have built, each with its description underneath. At least one is required — the form refuses with “At least one role is required” — and you can give someone several, in which case their permissions are the union of all of them.
This block loads separately from the rest of the form, so give it a second to appear. If it
comes up empty, reading “No tenants available for user management”, then user management is
switched off for the tenant or you don’t hold user:edit in it.
Removing access
Section titled “Removing access”Row actions on the Users list only appear when you hover a row. Deleting needs the separate
user:delete permission, and the trash icon does what you would expect: the account is
removed.
The one exception is a person who also holds roles in another of your tenants. There the same icon only revokes this tenant’s roles, and their account — along with their access elsewhere — survives.
You cannot delete yourself: the trash icon is hidden on your own row. Accounts you are not allowed to manage show a view (eye) icon instead of the pencil and trash.
Roles: what a user can do
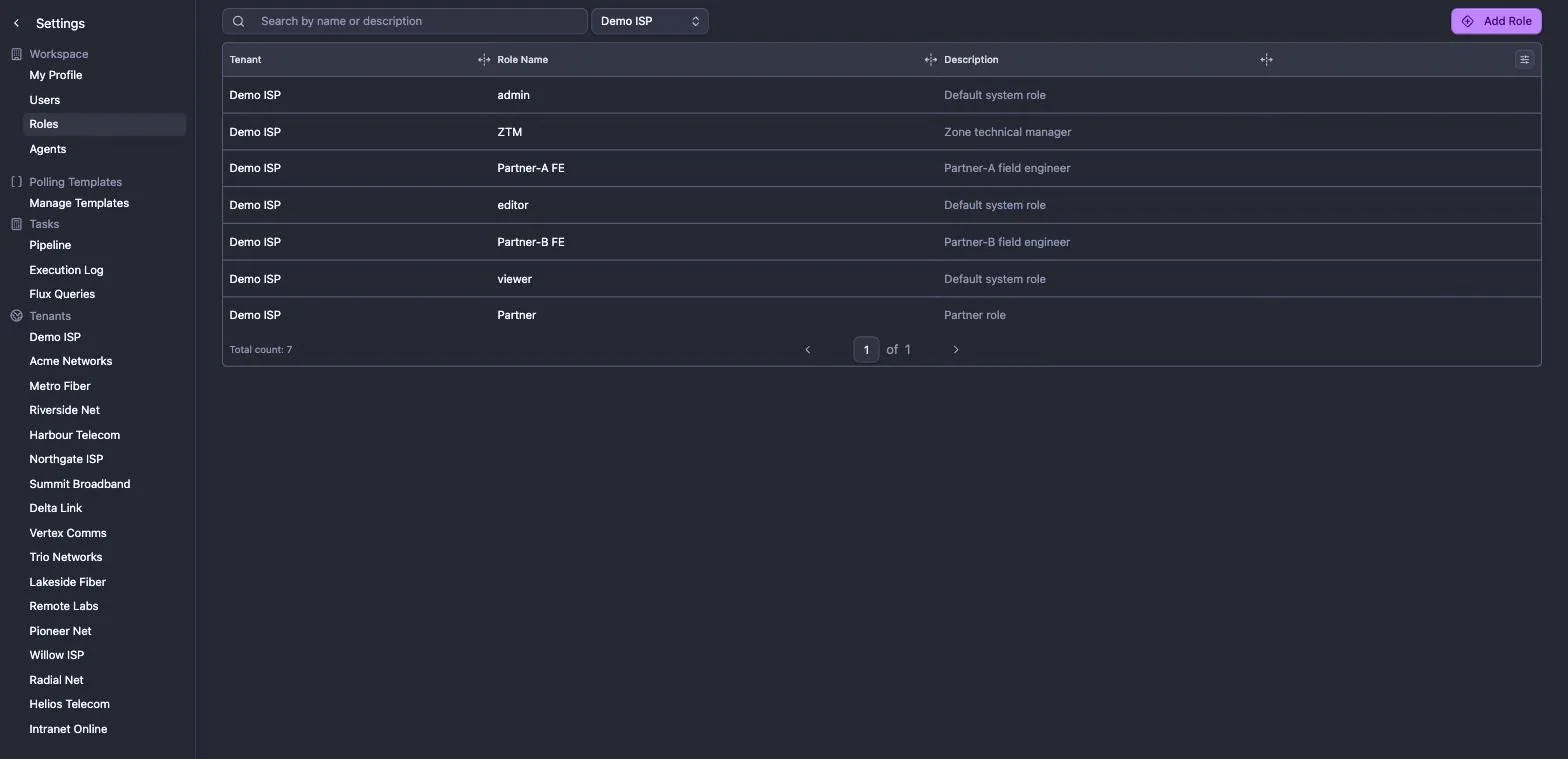
Section titled “Roles: what a user can do”Roles are per tenant and live under Settings → Roles. Three come as Default system roles:
| Role | Intent |
|---|---|
| admin | Full control, including user and role management |
| editor | Can change things, but not manage users or roles |
| viewer | Read-only |
Everything else in the list is a custom role somebody in your organisation created.
A role is a set of permission keys shaped resource:action, for example olt:view,
onu:edit, switch:port:delete, user:role:edit. A user can hold more than one role in
a tenant, and their effective permissions are the union of those roles.
Constraints: what a user can see
Section titled “Constraints: what a user can see”Editing a user (Settings → Users, then the pencil on their row) shows three independently saved sections: Edit User (name, email, phone), Manage Roles (the per-tenant role selection) and the constraints below it, saved with their own Save Constraints button.
Constraints narrow visibility by Sites (POPs), Zones, Partners, and IP addresses. The first three are matched against the Site/Zone/Partner ID carried by each device in the inventory.
Two rules decide everything about how they behave:
- A user with no constraints sees everything their role allows. Constraints are opt-in scoping, not a default deny. Leaving all four empty is the normal state for your own NOC staff.
- Different constraint types combine with AND; values inside one type combine with OR.
A user with Zones =
metro_east_1, metro_west_2sees devices in either zone. A user with Zones =metro_east_1and Partners =LCO-4412sees only devices that are in that zone and tagged with that partner — the intersection, not the union. This trips people up: if a user reports seeing nothing, an accidental second constraint type is the usual cause.
Because visibility keys off inventory metadata, this only works as well as your device tagging. The Sites/Zones/Partners dropdowns are populated from the IDs that actually exist in your inventory, so an ID you have never assigned to a device won’t be selectable. Assigning Zone, Site and Partner IDs when adding devices is what makes granular access possible later.
Restricting access by IP
Section titled “Restricting access by IP”The IP Addresses field accepts exact addresses and CIDR ranges (10.0.0.0/24). It is
a create-as-you-type field: type a value and press Enter to add it as a chip.
Worth understanding precisely: this is enforced on every request, not just at login. A user whose IP falls outside the list is authenticated but blocked, and sees
You are logged in, but you do not have permission to access this page from this IP address.
So a user who logs in at the office and later reconnects from a mobile hotspot is cut off mid-session. Note also that it is the public egress IP that is matched, so users behind a corporate VPN or NAT all present the same address, and a customer’s “our office IP” is usually one address, not a range. An empty list means no IP restriction at all.
Scenario 1: a custom role
Section titled “Scenario 1: a custom role”Use this when the built-ins are the wrong shape — most often “read-only, but only for the OLT/ONU world” for support staff who resolve subscriber tickets and shouldn’t be able to touch switches or settings.
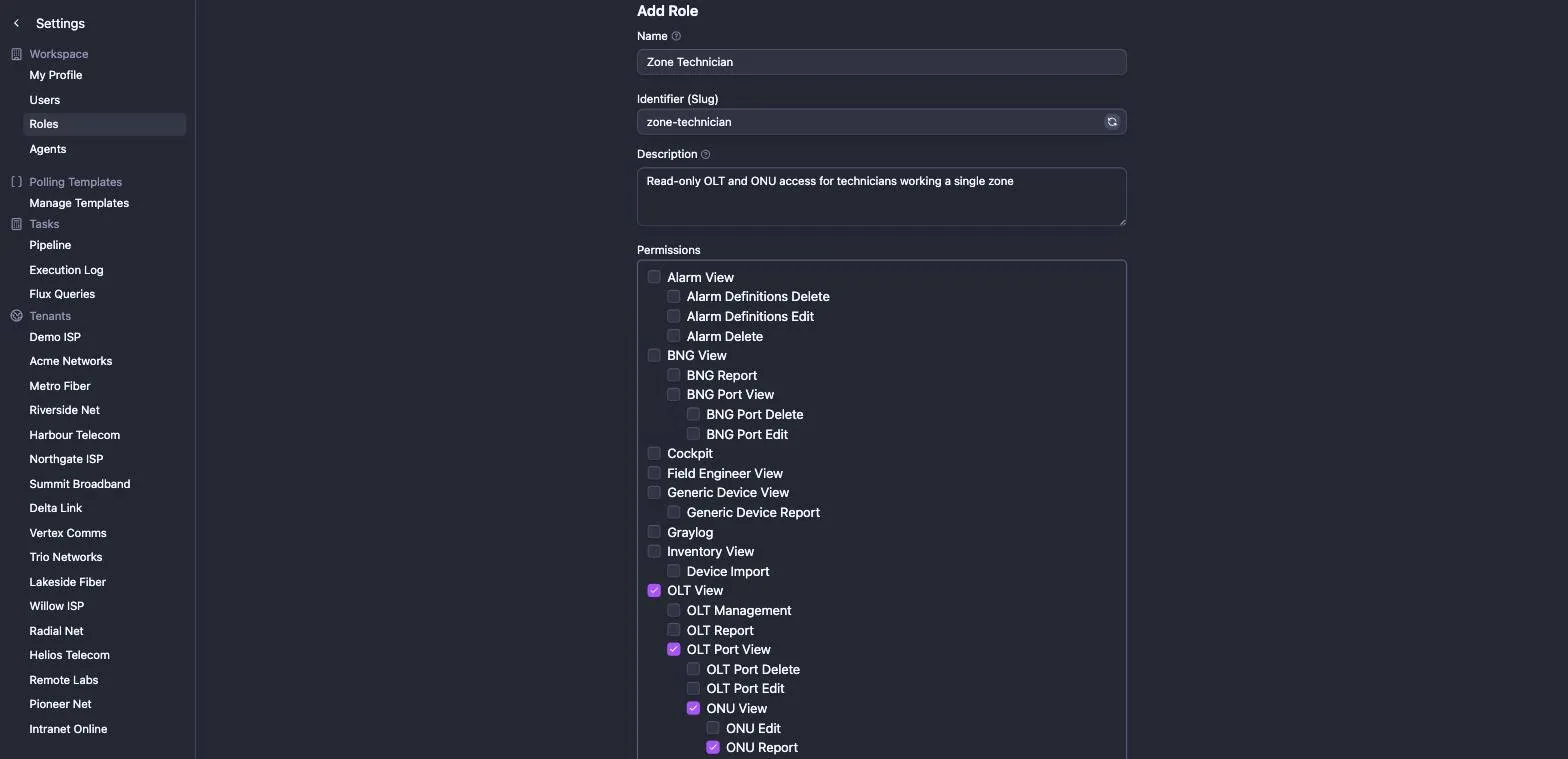
Go to Settings → Roles → Add Role:
- Name — what people will see (up to 128 characters).
- Identifier (Slug) — auto-derived from the name; lowercase letters, digits and hyphens only, up to 30 characters. It cannot be changed after the role is created, so it’s worth a moment’s thought.
- Description — optional, up to 512 characters. Worth filling in: on a tenant with a dozen custom roles this column is the only thing telling them apart.
- Permissions — tick what the role may do. At least one is required.
Permissions depend on each other
Section titled “Permissions depend on each other”The permission list is a tree, and the nesting is not cosmetic — a child permission is meaningless without its parents. Reading ONU data requires being able to see the OLT and its PON ports in the first place.
When you tick something nested, NetSense tells you what else it needs and asks you to confirm rather than silently adding it:
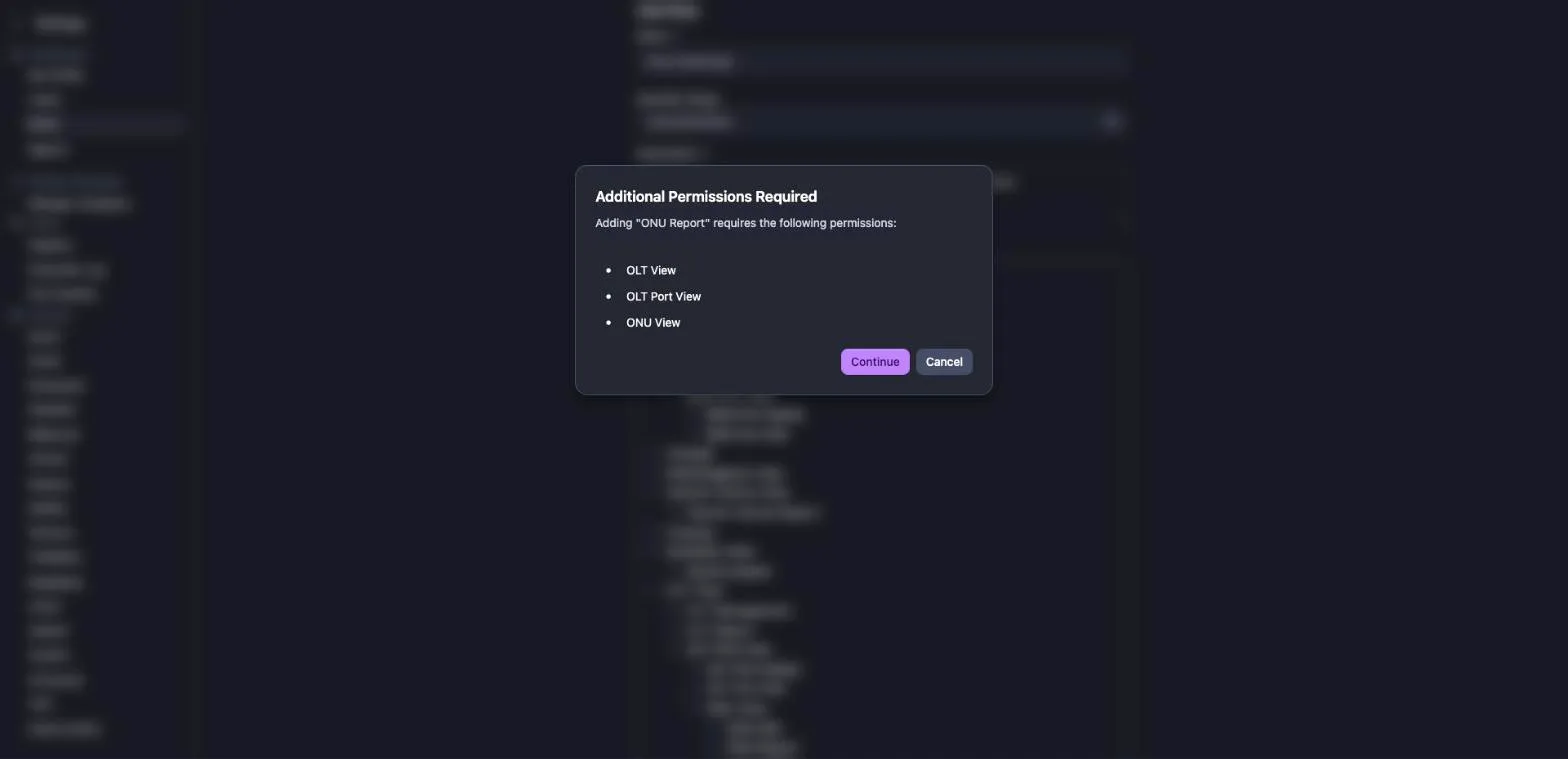
Choose Continue and the prerequisites are ticked along with your selection. This is
why a role you meant to keep narrow can end up with more *:view permissions than you
expected — that’s correct behaviour, not a bug.
Two things to know when planning a role:
- Device create, edit and delete are one permission.
olt:editcovers creating, editing and deleting OLTs;switch:edit,bng:edit,server:editandgeneric:device:editwork the same way for their types. There is no way to grant “may add devices but may not delete them” — if that matters, withhold the edit permission and have a smaller group do the inventory work. - Roles are global to the tenant, constraints are per user. A role never mentions a
zone, site or partner. Build one “Zone Technician” role and reuse it for every zone,
varying only the per-user constraint. Don’t create
zone-technician-eastandzone-technician-west.
Edit a role later by clicking it in the list; its slug stays fixed, everything else is
editable. Deleting a role needs the separate user:role:delete permission.
Scenario 2: scoping a user to specific devices
Section titled “Scenario 2: scoping a user to specific devices”The common ask is “this engineer should only see the devices in their zone” — or their POP, ring, or city. NetSense has no per-device access list; you scope by the grouping ID the devices already carry, which is why the tagging in adding devices matters.
- Tag the devices. Every device in scope needs the same Zone ID (or Site ID for a single POP). You can set this when creating a device, or edit existing ones.
- Give the user a role. Usually a read-only or narrow custom role, e.g. the Zone Technician built in Scenario 1.
- Add the constraint. On the user’s page, pick the Zone (or Site) and Save Constraints.
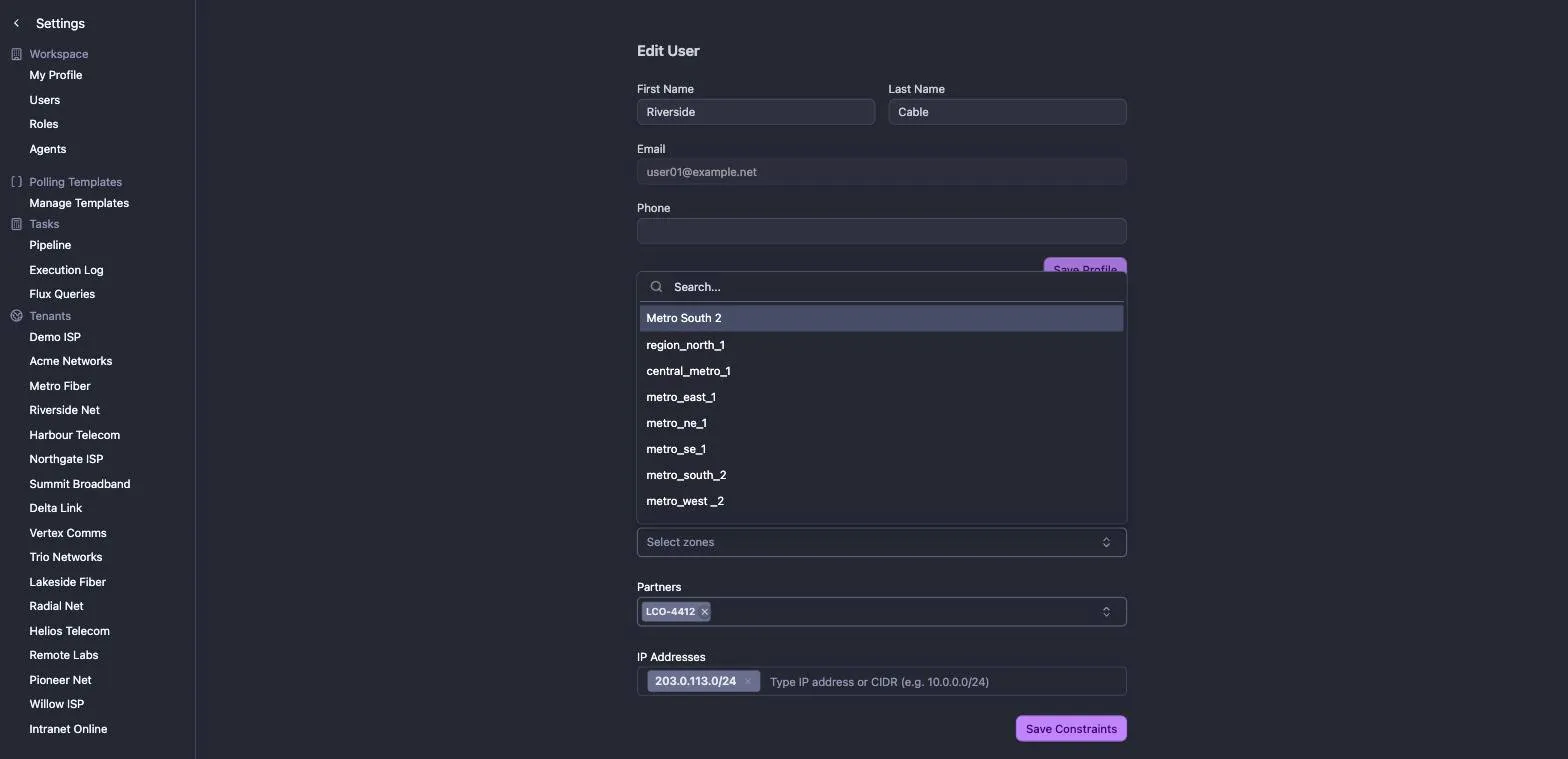
The dropdown lists only IDs present in your inventory — if the zone you want isn’t there, no device carries it yet, and the fix is in the inventory rather than here.
Which field to use is a matter of what the grouping means to you: Site ID is a single POP and also drives the mobile/field-engineer view, so a technician constrained by Site gets exactly their POP on their phone. Zone ID is the wider regional grouping and is also usable for alarm routing. Devices carry both, so you can tag once and scope either way.
Remember the AND rule: to give someone two zones, put both IDs in the Zones field. Putting one in Zones and one in Sites gives them the intersection, which is usually nothing.
Scenario 3: partner and LCO access
Section titled “Scenario 3: partner and LCO access”For an ISP working through local cable operators, each LCO should log into the same tenant and see only the devices in their own network — nothing about the ISP’s core, and nothing about other LCOs.
The full recipe:
- Tag each LCO’s devices with their Partner ID in the inventory. This is the piece that does the actual work; everything else is bookkeeping.
- Create a restricted role for partner staff — a read-only role, or a narrow custom
one. Do not give partners
user:*permissions, or they can create their own accounts. - Create the LCO’s users and set a Partners constraint matching their ID.
- Optionally add an IP constraint so the partner portal only opens from their office or NOC.
- Route their alarms to their own channel using the same Partner ID, see alarm routing.
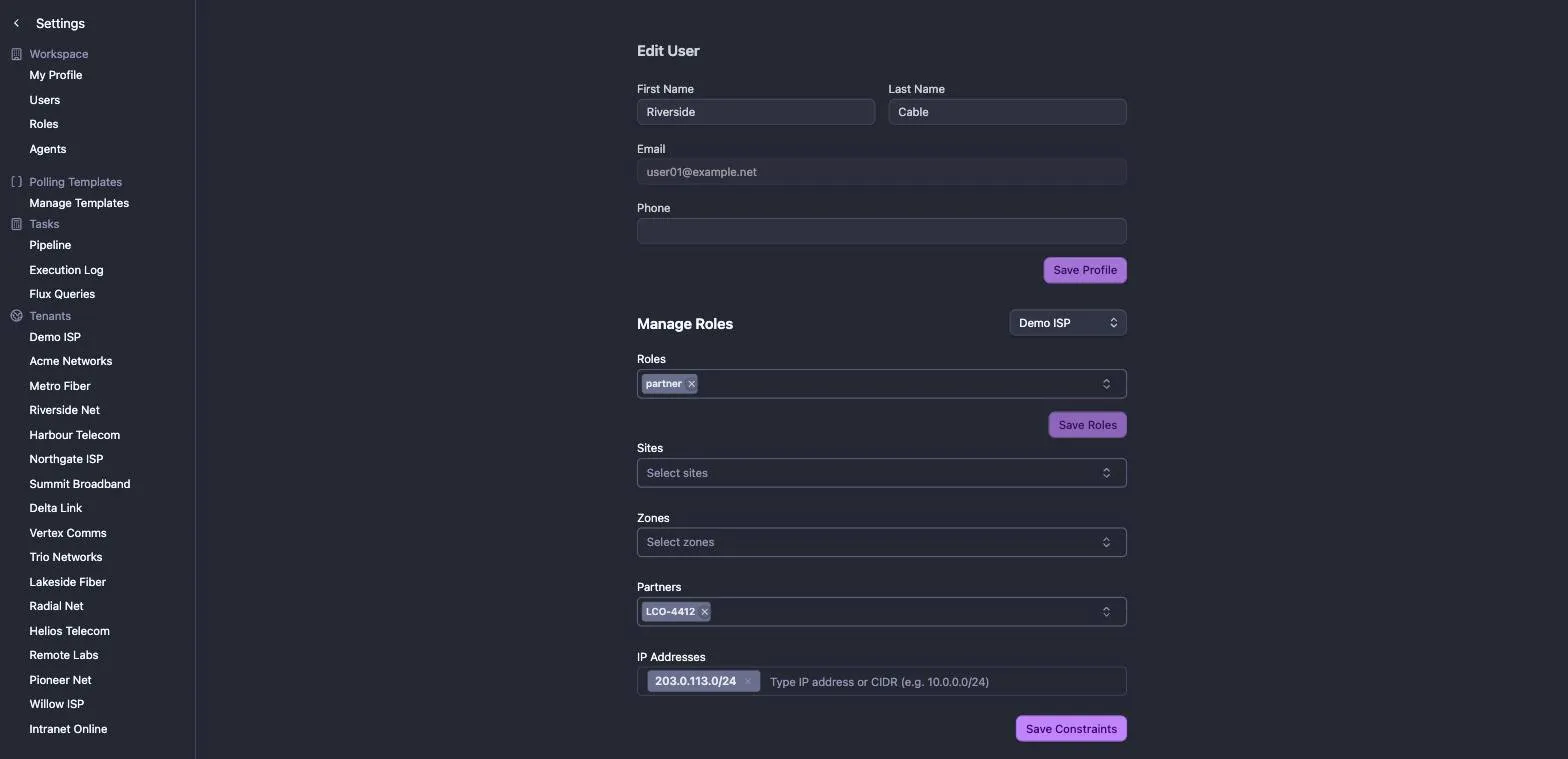
The result: every LCO logs into the same tenant but sees only their own devices, their alarms land in their own group, and your NOC keeps the full picture. Because the Partner ID lives on the device, moving a device between LCOs is a single inventory edit — no user or role changes.
Two practical notes from operators running this at scale:
- One Partner ID per LCO, assigned centrally. Partner IDs are free-text on the device, so a typo silently creates a second partner that nobody can see. Keep the list somewhere authoritative and paste it.
- Give the LCO more than one user. A shared login makes the audit trail useless and means an offboarding turns into a password rotation for everyone.
The same mechanism serves your own field teams: constrain by Site, and an engineer sees exactly their POP.
Practical tips
Section titled “Practical tips”- Prefer read-only by default: viewers can see graphs, alarms and ONU data, which covers most day-to-day needs; hand out admin sparingly.
- Combine role + IP restriction for sensitive accounts: an admin login that only works from the NOC subnet is a much smaller attack surface.
- When someone reports “I can’t see device X”, check four things in order: their role, whether they logged out and back in, their constraints (including an accidental second constraint type), and whether the device actually carries the Site/Zone/Partner ID you expect.
- When someone reports “I get a permission error on one page only”, it’s usually a missing parent permission in a hand-built custom role. Re-open the role and re-tick the leaf permission so the dependency prompt fills in what’s missing.