
Adding devices to NetSense
Once your agent is installed, adding devices is a two-minute form per device, and they start polling immediately, no extra configuration on our side. This guide covers the form, the one field pair that causes most problems (manufacturer and model), and the recommended rollout order.
Before you start
Section titled “Before you start”- Have your SNMP community ready. You can reuse the community your existing NMS already uses, there’s no need to create a new one for NetSense.
- On each device, permit the agent’s IP in the SNMP access list (SNMP v2c). See Device added but SNMP won’t poll for why this is the most common snag.
- Knowing your brands and models up front helps: it’s worth checking them against the supported vendors and models list first.
Adding a device
Section titled “Adding a device”Go to Inventory → Devices → Create Device. Mandatory fields:
| Field | Notes |
|---|---|
| Hostname | The name you’ll see everywhere; pick a convention and stick to it |
| IP address | The management IP the agent can reach |
| Device type | OLT, Switch, BNG, Server or Generic; decides which views the device gets |
| Manufacturer / Model | These select the polling template, see below |
| SNMP community | Your existing v2c community |
Turning on Advanced options reveals three organizational IDs and a credentials toggle:
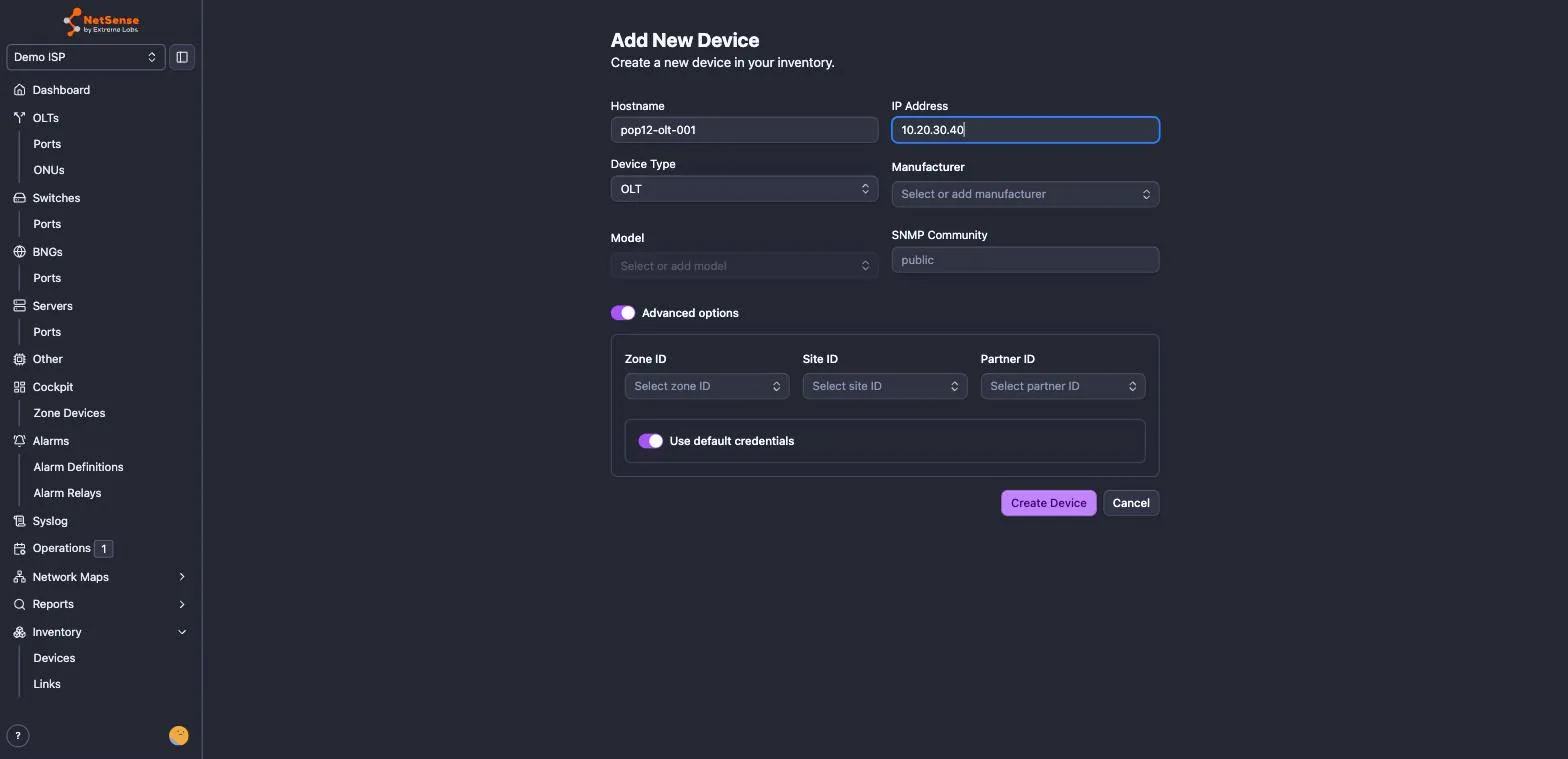
- Zone ID: a regional grouping, usable for alarm routing.
- Site ID: the POP the device belongs to. This drives the mobile view, so field engineers see their own site’s devices.
- Partner ID: tags devices belonging to a partner or local operator (LCO). It scopes portal access (partners see only their devices) and routes their alarms to their own channel.
- Use default credentials: on = tenant defaults; off = per-device credentials.
These three IDs look like optional paperwork and are anything but: they are the only mechanism NetSense has for scoping who can see which devices. There is no per-device access list — a user is restricted to a zone, a POP or a partner, and that match is made against exactly these fields. Tagging as you go costs seconds; retro-fitting it across a few thousand devices later does not. See scoping a user to specific devices and partner and LCO access for how they’re used.
Devices appear and begin polling as soon as they’re created. The device list is tabbed by type (OLT / Switch / BNG / Server / Generic), and a “Last Updated” timestamp shown in red is the quick tell for a device that has stopped polling.
Editing a device
Section titled “Editing a device”Anything you set when adding a device can be changed later, so you rarely need to delete and re-add one. In the device list, hover the device’s row and click the pencil icon to open its details, change what you need, and click Update Device. The button stays disabled until you actually change something, and the same field rules as the create form apply.
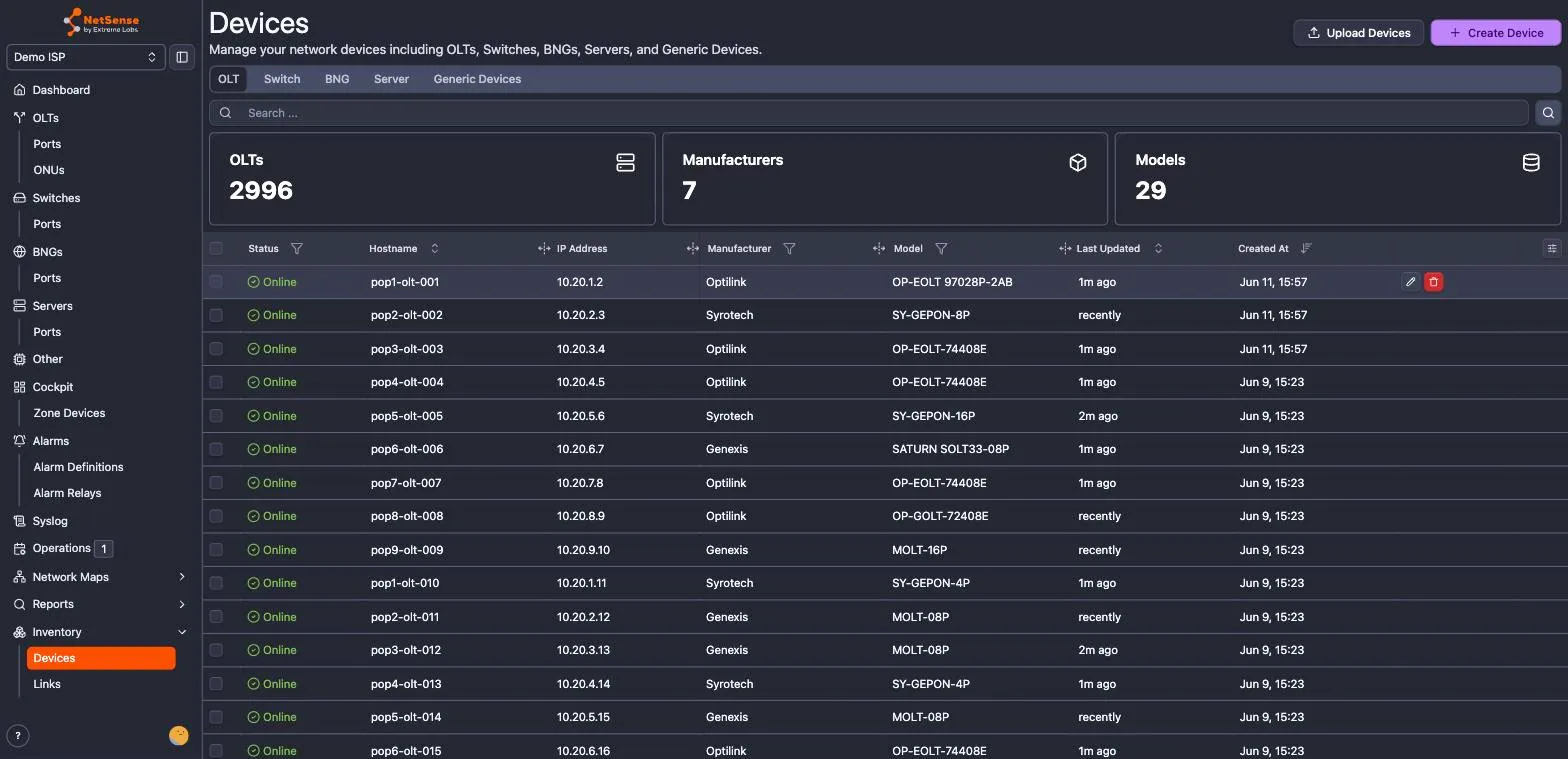
- IP address, hostname, SNMP community and the advanced options (Zone / Site / Partner IDs, credentials) are all editable. Correcting a wrong IP or a community that was rejected is the most common edit, and polling picks up the new value on the next cycle.
- Device type is fixed once a device exists, that field is locked in edit mode. If you genuinely added it as the wrong type, delete it and add it again.
- Manufacturer and model can be changed, and this is how you fix a device that polls but shows the wrong data, for example a GPON OLT that was added as EPON and shows no ONUs. Because these two fields select the polling template, changing them swaps the template. Run a rediscover afterwards so the device re-reads with the correct template; it starts reporting correctly within about 5–10 minutes.
Deleting a device
Section titled “Deleting a device”The trash icon sits next to the pencil on the device’s row. Deleting removes the device and its collected data from NetSense; it does not touch the device itself, and the agent simply stops polling it.
Reach for delete in only two situations, because everything else is an edit:
- The device was added as the wrong type. Device type is the one field that cannot be changed after creation, so an OLT added as a Switch has to be deleted and re-added.
- The device is genuinely gone — decommissioned, or returned.
For a device that has merely moved, been re-IPed, renamed or re-homed to another partner, edit it. Deleting and re-adding loses its history and detaches it from anything referencing it, most notably network maps, which do not re-bind to a re-created device — you have to edit each affected map and re-attach the node.
Permissions for add, edit and delete
Section titled “Permissions for add, edit and delete”All three actions share one permission per device type: olt:edit covers creating,
editing and deleting OLTs, and switch:edit, bng:edit, server:edit and
generic:device:edit do the same for theirs. If you don’t see the Create Device button or
the pencil and trash icons, your role lacks that permission for that type.
There is deliberately no separate “delete” permission for devices, so a role cannot be given add-and-edit rights while being denied delete. Where that separation matters, keep device-edit permissions with a small group and give everyone else a read-only role — see building a custom role.
Bulk import is gated separately by device:import, so you can let a team load devices from
a file without granting them per-device edit rights.
Manufacturer and model select the template
Section titled “Manufacturer and model select the template”NetSense doesn’t use one generic SNMP profile: each vendor and model family has a tuned polling template (which OIDs to read, how to interpret them). The template is matched from the manufacturer and model names you enter, so exact names matter:
- Use the names as they appear in the supported models list.
- If your model is missing from the dropdown, type it and choose the “create” option, then tell us the model so we map it to the right template.
- A device that polls basics but shows no traffic or ONU data usually has a wrong or swapped manufacturer/model (a classic: the manufacturer name typed into the model field). Fix the names, then run a rediscover on the device to resync.
When in doubt about what a device really is, display version / show version output
settles it.
Recommended rollout order
Section titled “Recommended rollout order”Add core first, then work outward: BNG → OLTs → switches, or build your network map, add the switches and routers on it, then the OLTs. Two practical notes from hundreds of onboardings:
- Add your first OLT and first switch, then do the 30-minute onboarding session with us before bulk-adding, it catches naming and ACL issues while they’re cheap to fix.
- OLT monitoring is where NetSense earns its keep: if you start switches-only, add OLTs early for last-mile visibility. During a trial, keep every OLT model you own in the system so each template gets validated against your fleet.
Expect port-down alarms from unused ports on freshly added switches; see Taming alarm noise for the two-minute cleanup.
Bulk adding and NetBox
Section titled “Bulk adding and NetBox”For larger fleets there’s bulk upload from a CSV or XLSX file, and for operators running NetBox as source of truth, NetSense can ingest devices and links from it continuously. The NetBox route has its own rules of the road: devices must be Active with a primary IP, device roles must map to roles NetSense knows, and device-type names must exactly match the NetSense templates. Link speeds and inter-device links are also taken from NetBox, so wrong data is fixed there and propagates. If you run NetBox, tell us and we’ll set the sync up together, validated on staging before it touches production.
After adding devices
Section titled “After adding devices”- Enable device syslog early, it unlocks the real-time features.
- Review device states so Warning vs Down reads correctly.
- Set up alarm delivery so the right people hear about problems.