Most networks need one NetSense agent. Larger or segmented networks can run several, for example one per POP or data center, so each agent polls the devices it can reach directly. A second agent is also how you keep polling running when an agent’s server fails: see Two agents for redundancy. This guide covers how NetSense decides which agent polls a device, what happens when an agent goes offline, and how to move devices between agents.
How devices are assigned
- One agent is the tenant default. The first agent of a tenant becomes the default automatically. Every device without its own assignment is polled by the default agent, so adding a second agent changes nothing until you assign devices to it.
- A device can be assigned to a specific agent. From then on that agent polls it.
- Failover is automatic. If a device’s agent is offline or disabled, the default agent takes over, then any other online agent. When the device’s own agent is back, the device moves back to it. Nothing needs to be changed by hand in either direction.
A change of agent applies within about 30 seconds.
Assigning a device to Tenant default and assigning it to the agent that happens to be the default today are not the same thing:
| Choice | What the device does when you later make another agent the default |
|---|---|
| Tenant default | Follows the new default |
| The default agent by name | Stays on that agent |
Use Tenant default for devices that should simply go wherever the default is. Name an agent only when the device must be polled from that location.
Who sees what
Two role permissions control the agents, both shown in the role editor under Admin → Roles (see Users, roles and partner access):
| Permission | What it allows |
|---|---|
agent:view (Agent View) |
The Agents item under Admin, the agent pages, the Agent column in Inventory and the read-only Polling agent card on a device’s edit page |
agent:edit (Agent Edit) |
Everything that changes an agent or moves devices: Assign agent, Remove from agent, Add devices, Set as default, and the agent actions menu. Requires Agent View |
The built-in admin role has both. The built-in editor and viewer roles have neither, and you can add either permission to a custom role.
Without Agent Edit the Agents page shows a Read-only badge and the note “Agents are provisioned and maintained by NetSense support.” Everything is visible, but nothing can be changed. A user who can’t see agents still has their devices polled as usual; the agent controls are simply hidden.
The Agents list
Open Admin → Agents. Each row is one agent of your tenant:
- Name, with a status icon and a default badge on the tenant default. The icon is a green check when the agent reported in the last two minutes, red when it has not (offline), a question mark when it has never connected, and gray when it is disabled.
- IP Address, Platform (operating system and architecture), Running Version, Last Seen and Created At. Some columns only appear on a wide enough screen.
Search by name, IP address or version. Expand a row with the arrow on the left to see the agent’s CPU, Memory and Disk usage over time; the time range picker in the top right sets the period for every expanded row (Last 24 hours by default). The list refreshes itself every minute.
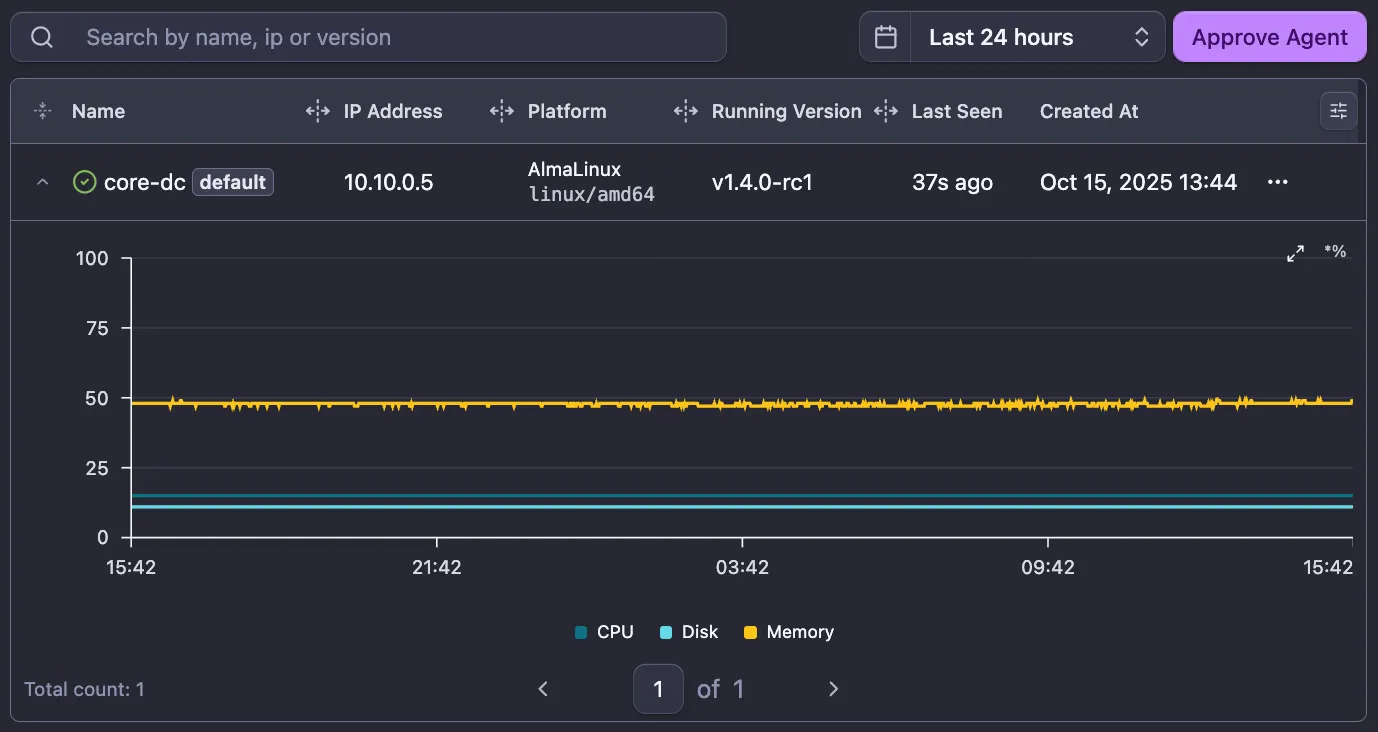
With Agent Edit, the ⋯ menu on each row offers:
- Rename.
- Upgrade: lists the published agent versions with their channel, release date and size. Pick one and the agent downloads it for its platform, verifies it and restarts. Running Version shows a pending badge until the agent reports the new version, then updated, or failed if the upgrade did not succeed. Installing an older version asks for confirmation first.
- Set as default: makes this agent the tenant default. Devices on Tenant default follow it.
- Disable Agent / Enable Agent: a disabled agent polls nothing, and its devices fail over as described above.
- Remove Agent: devices assigned to it go back to the tenant default. The default agent can’t be removed while the tenant has other agents; the menu says “Set another agent as default first”. Removing the last agent of a tenant stops polling altogether, so the confirmation warns you.
Adding an agent
New agents are installed by Extreme Labs, the same way as the first one: see Installing the NetSense agent. When a new agent connects it is approved with a six-digit one-time code. Our team normally does this as part of the setup. If your role has Agent Edit you can also do it yourself: click Approve Agent on the Agents page and enter the code you received from us.
A new agent that is not the first one starts with no devices. Assign devices to it as described below.
An agent’s page
Click an agent’s name to open its page. The top shows its IP Address, Hostname, Platform, Running Version, Last Seen and Created At, then a Metrics chart with CPU, memory and disk usage and its own time range picker.
Below that is the list of devices the agent polls. On the default agent this includes every device without an assignment of its own.
- Search by hostname or IP address, then press Enter or the search button.
- Filter with the column headers: Status, Type (OLT, Switch, BNG, Server, Wireless, Other), Manufacturer, Model, Site, Zone and Partner. The Site, Zone and Partner filters include No site, No zone and No partner, to find devices that are not tagged yet. Site, Zone and Partner are hidden by default: turn them on from the column settings.
- Sort by Hostname or Created At.
With Agent Edit you can change the list from here:
- Select devices and click Assign agent to move them to another agent, or to Tenant default.
- On a non-default agent, Remove from agent (in the selection bar, or the trash icon on a row) takes devices off the agent. They go back to the tenant default. The default agent has no Remove: its devices are moved with Assign agent instead.
- Add devices, in the top right, opens a search across all device types (type at least 2 characters). Tick the devices and click the Assign button, which counts them. Devices already assigned to another agent are moved to this one. Devices already on this agent are marked assigned and can’t be ticked; on the default agent that includes every device without an assignment of its own.
- Set as default and the ⋯ menu offer the same actions as on the Agents list.
Assigning devices from Inventory
You don’t have to open an agent to move devices. Two places in Inventory do it too.
One device. Open the device’s edit page (Inventory → Devices, then the pencil on its row). The Polling agent card below the device form shows the current agent. Pick another one and confirm with Change agent (the card’s Applies on confirm badge is a reminder). The card is saved on its own, not with Update Device, and applies within 30 seconds. If you pick an agent that is offline or disabled, the confirmation tells you that another online agent will poll the device until it’s back.
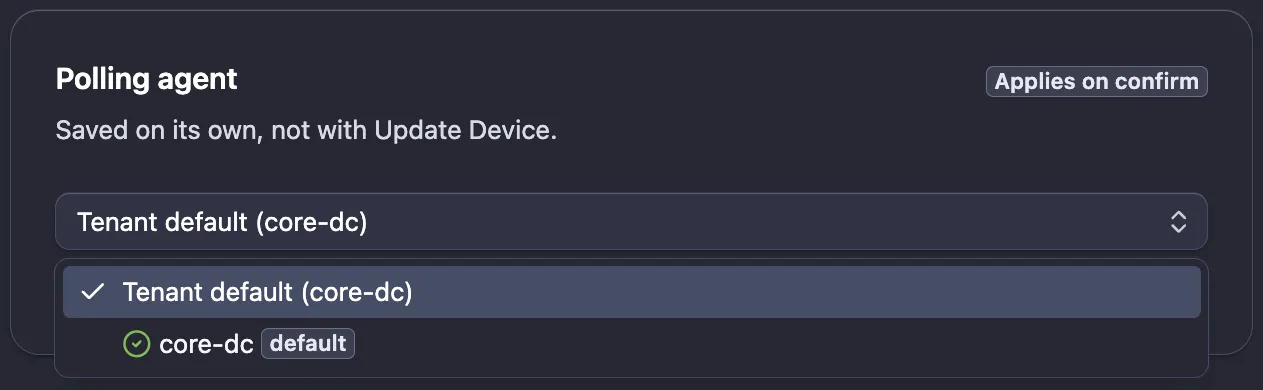
Many devices. In the OLT, Switch, BNG, Server, Wireless or Generic Devices table, select the devices and click Assign agent in the selection bar. Choose an agent, or Tenant default to remove the devices’ own assignment so they follow the default again. The dialog repeats the difference: “They stay on agent, even if the tenant default changes” versus “They follow the tenant default, also after it changes.”
The Inventory tables also have an Agent column, which you can filter by agent. A device without its own assignment shows the default agent’s name followed by (default).
Two agents for redundancy
A second agent also covers the loss of the first. With one agent, polling stops for the whole tenant while its server is down. With two, the other agent carries on.
There is nothing to switch on: it is the failover described in How devices are assigned. The usual pair is a main agent and a backup:
- Main agent. The tenant default. Leave your devices on Tenant default and it polls all of them.
- Backup agent. No devices assigned. It takes over every device when the main agent is offline or disabled, and hands them back when the main agent returns.
Only one agent polls a device at a time, so the backup adds no SNMP load to your devices.
You can also split your devices between the two agents instead. Each one then covers for the other, on the same conditions.
What the pair needs
- A separate server for the second agent. A second VM on the same host goes down with the host. Ask us for the install, as described in Adding an agent.
- The same reach from both agents. The backup needs a route to every device, the firewall rules from the firewall checklist, and its own IP in each device’s SNMP access list. A device that only permits the main agent’s IP is the usual gap: the failover happens, and that one device stops reporting.
- A test before you rely on it. Assign your devices to the backup agent for a few minutes (see Assigning devices from Inventory). Any device that turns Warning or Down is one the backup can’t reach. Fix its access, then assign the devices back to Tenant default.
What failover doesn’t cover
- Syslog. A device sends syslog to the agent IP set in its own configuration, and that doesn’t move when polling does. While that agent is down, the devices that send syslog to it are still polled by the other agent, but their syslog is not received until it is back. See Device syslog.
- An agent that is online but cut off. Failover follows the agent’s status, not each device’s. If the main agent is running but has lost its route to part of the network, those devices turn Warning or Down and stay with it.
- A copy of the agent VM. A snapshot or clone is not a backup agent. Agents are updated often, so a copy is out of date by the time you need it. Run two agents all the time.
When something goes wrong
If every device behind one agent turns Warning at the same moment, that agent is the suspect. Check its status and Last Seen on Admin → Agents, then work through Every device went Warning at once. Failover keeps the devices polled from another agent where it can reach them, but a device that only the offline agent can reach stays without data until that agent is back.